Gunblade build: Finding the correct axes

In the last post I described how I tried to design the missing parts and figure out the axes of the gunblade using CAD - and failed. That was in May 2023, and looking back at my photos, I spent quite some time with the cardboard model, probably just staring at it most of the time. Yet, I always ended up with something not aligning the way it does in the reference artwork I used. Now you could argue that it's not relevant if the slot on part A actually aligns with the contour of part B, but I noticed they do in the artwork and in my imagination some designer at Square Enix intentionally made it so, so I should be able to get it right, as all the parts themselves were correct.

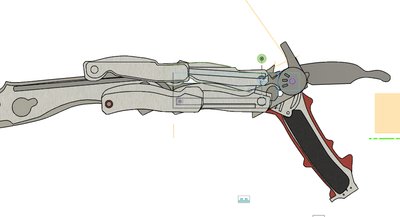
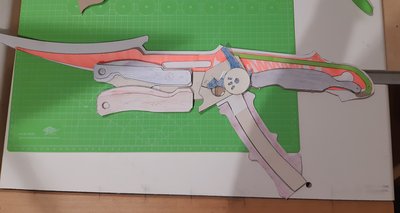
Gunblade cardboard model in gun form In July, I got it right. This photo shows the cardboard model with the aforementioned slot ligning up perfectly. Also, the light blue part on the right that almost reaches the thin green part is in the right position. In the artwork, it looks like the blue part is screwed onto the green part or something like that, so I wanted those to match and have an actual mechnical connection there.

At this point I got distracted. An invitation for a halloween party caused me to consider to make the project an actual cosplay. Skip to November and imagine me wearing my old white judo jacket with a chest belt and brown boots. I also bought some more leftover leather pieces from a shoemaker I had previously bought leather pieces from, this time brown shades instead of black. The costume will make for an own article - I learned a lot, I worked a lot and I actually created it. I did, however, forget the solution to my axes problem, as I had only documented my process in the form of photos and the photos only show that I had worked it out but not how.

In December, I made a 1:1 wood prototype. It didn't look good but it was satisfying to hold because it weighed a lot. I also stared at my cardboard model much longer, trying to figure out how the axes that move the blade work - again. Looking back, it was probably because I didn't yet realize why the model had previously worked, which also explains why I didn't write it down. I'll skip to the point where I realized it.

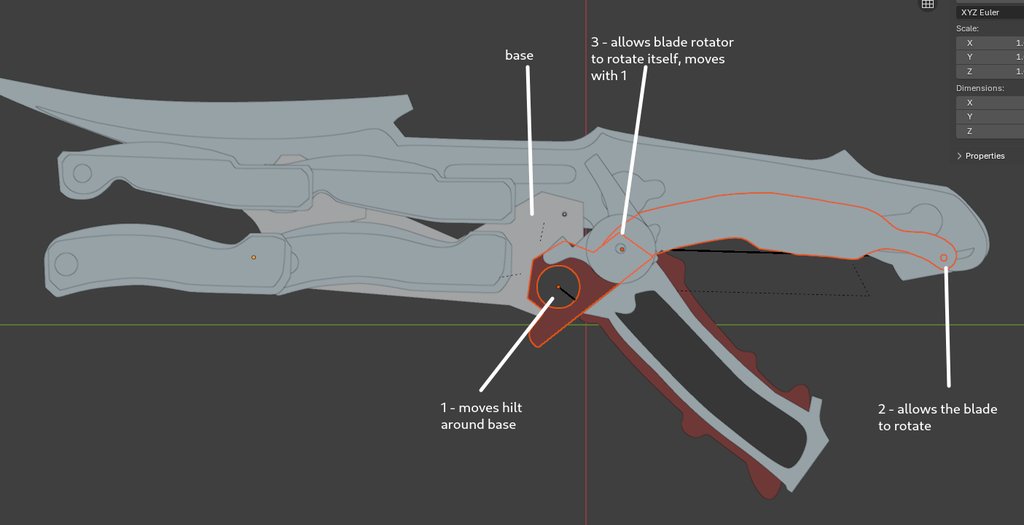
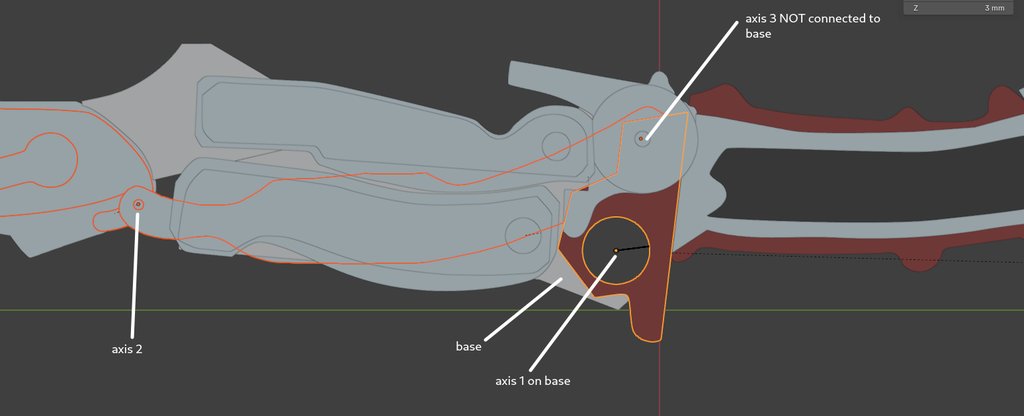
The gunblade has three axes in total. One is on the base, allowing the hilt1 to rotate to the gun position - that's the hole in the part above the hilt. The second is on the blade (connecting the blue and green part as mentioned above). The trick is the third axis, which allows the blue part (that holds the blade) to rotate as well. I always thought it was on the base, too, but it's not. It's on the part with the hole and therefore rotates around the base axis, moving it further down. This way, the blue part (blade holder) moves the blade further away from the base then its own length, allowing the blade to align with the base perfectly. That's what I could not figure out for months - The parts on the base and the blade are in specific positions relative to each other in sword form and also in gun form but I could never make it so that both would be correct after rotating. Now it works - at least in theory, actually building this thing is a topic for another article.

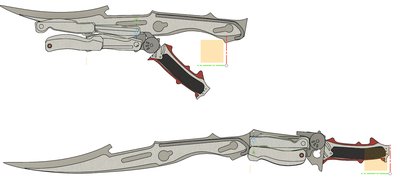
Notice the distance between the blade holder and the base in gun form (upper image). That exists because axis 3 rotates around axis 1. The above images are screenshots from Blender - I really wanted an animated model, so several iterations later, I recreated all the parts in CAD again, this time in Blender, not in Fusion. I might write something about that later, too, basically it was easier to do then in Fusion because Blender can import vector graphics more easily and nothing is real, meaning parts do not actually have to connect to each other. That also makes the animation will break more easily as Blender does not really "know" what parts are moving, what joints are and what axes are, but it is good enough for now.

From December 2023, I actually started making parts from wood. I had ambitions to be done by March 2024 to participate in Leipziger Buchmesse, one of the biggest events relevant for cosplayers2. We'll see how that went.

--

You can receive new blog posts using a feed reader and my Atom feed. If you want to talk to me, you can do so in the Fediverse. I am on Mastodon. You can also write an e-mail to blog [at] konzertheld.de.

  1. This term included some research how the grip / handle of a sword is called and if "hilt" is appropriate in the case of the gunblade, which barely resembles an actual sword. I did however decide to use it as the base actually goes into the part that you hold. 

  2. Actually, it's called Manga Comic Con. It shares the fair halls with Leipziger Buchmesse though and they use the same ticket so nobody refers to the Cosplay and Manga/Anime part as Manga Comic Con. 


Gunblade build: Struggling with CAD

So, I had a cardboard model that looked pretty good but made no sense mechanically. There are several things that happen with the gunblade when it transforms from sword to gun in the game:

  • The blade moves back to the handle and gets somehow stored
  • The decoration elements between the handle and the blade extend, becoming twice the length, and rotate by 180 degrees
  • The handle rotates by about 45 degrees so that it looks more like a gun handle in an angle that makes sense when you want to fire a gun
  • This also has the effect of revealing that the hole in the part above the handle is the trigger

I will not get into the crazy details that make the gun look like an actual gun from the front as that clearly takes advantage of CGI trickery and is probably impossible to implement in a model that actually transforms. There are some pretty great props out there of either the gun form or the sword form though.

CAD model of Lightning's gunblade, both forms, textures only vaguely similar, positioning looks okay but connections are a little off In the CAD model, you can see both forms and how they correlate to each other. You can already tell I did not get the part between the handle and the moving decoration elements right. I also failed to make correct joints. I actually managed to make an animation with a moving blade but it was always off somehow. CAD turned out to be a difficult tool for a process where you want to find a missing part - it is made for people who already know all the parts and think about assembly. Also, it took me quite a while to figure out how to work with vector graphics imports in Fusion; it's okay though once you get it.

While I had a hard time and was not really satisfied in the end, I got some ideas and insights from the CAD modeling process.

  • There is a part that is mostly hidden in sword form and attached to the blade that will then pull the blade back and become visible. This part is super important and can actually be seen in the game. I copied its form from someone who made an animation of the original transform. It turned out to match really well. You can see it in the following picture.
  • There actually is some kind of base, supposedly the magazine for the gun, below the decoration objects. As I later figured out, it actually becomes visible in the game and is visible in the gun form. So I can probably get away with building a same-colored structure that holds all my parts.
  • I am thinking of having a notch in that base that the decoration objects can slide in. That will be difficult to make as all those parts will be rather thin. You can see the groove in the following picture, too.
  • A mechanic that I really like and probably will not be too hard to make is to align the rotating blade thing with the trigger such that the rotating blade holder will rotate the trigger by pushing it. That way the handle can reach its gun form position "automatically".

Another view of the CAD model. The aforementioned groove is visible. With those ideas, I went back to the cardboard model and tried to make the two new parts. I also wanted to figure out the axes and attachment points - which, ironically, was a main reason why I started to use CAD: to simulate the movements. I gave up on that. Figuring out how to make movable joints that actually work and making adjustments to already assembled parts was just too tedious in Fusion 360. It's just not the right tool for the job. It did however give me the feeling that what I wanted to do was actually possible.

--

Du möchtest etwas zu diesem Artikel sagen? Schreib mir auf Mastodon @WildRikku@mastodon.gamedev.place oder einfach eine Mail an blog [at] konzertheld.de!


Review: Crash Bandicoot 4 - It's About Time

I love Crash Bandicoot. I was so happy when I read they wanted to make an actual Crash 4 in the spirit of the original trilogy. I played the trilogy like four times, on PS 1 and emulators. This is not what I wanted.

Crash 4 looks great and has a ton of great ideas. They have new interesting crate types, new power-ups of which most are cool, new characters, old characters with new story to them, more playable characters, new vehicles. They also did several things right: Get a gem for dying 3 times max, get a relic for not dying at all and beating a time. They have sidescroller levels in the original style with the original madness.

Unfortunately, the game is way too hard and not (only) because it was designed to be hard. It would be incredibly hard if it was without flaws, but that's okay, the original three were, too. In the original trilogy though, if you were skilled and had practiced, you could run through levels and enjoy how insanely good you are. In Crash 4, I am in like level 20 or so (the play time lies, I played a part of it offline, took me probably more than 10 hours) and I still miss platforms and crates all the time. The jumping is just weird and unpredictable. It has a jumping assistance where you get a circle on the ground but it does not help, it just shows how weird the movement is. It's worse for the rail parts.

Also, things frequently do not line up either physically or in time. Everything is curved. Yeah, we got 3D now, but no need to do the Hundertwasser Bandicoot. Perspective is also weird. And then you just can't run through levels because you frequently have to wait for things even if your timing should be perfect. It's just no fun. I am so sorry to say this. I switched to "infinite lifes" mode like ten levels ago and I lose like 30 lifes per level while in the original Crash Bandicoot (where you must not die to get a gem), I get the red gem in Slippery Climb in the first attempt. It's not me. I got all six gems in the first levels but then the levels got way longer and harder and now I am so frustrated, I am not even happy anymore when I get through a level at all.

I am not sure if I will finish this game. If you liked the trilogy remake and want a harder Crash Bandicoot, get the original ones and an emulator. If you want more Jump'n'Runs, get Ratchet & Clank (speaking for the older ones there, too, have not played the newer ones, though "Rift Apart" is supposed to be really good).

--

Du möchtest etwas zu diesem Artikel sagen? Schreib mir auf Mastodon @WildRikku@mastodon.gamedev.place oder einfach eine Mail an blog [at] konzertheld.de!


Gunblade build: Intro. How a small idea revived an old hobby

When I began to develop an interest in working in the gaming area, I found that I should settle on a nickname that I would go by on Discord and other relevant platforms. I wanted to use a name different from what I used in my private and not so anonymous life for years and after one or two iterations I came up with the name Wild Rikku, usually written as WildRikku. It is a reference to wild Pokémon and the character Rikku from Final Fantasy X and X-2.

After a while, I found that the name was a good choice. It was unique enough to be recognized, was not used on any platform I use or plan to use in the future, it refered to someone I can identify with and it did not raise too many questions. It's a girl's name, but I don't mind that and so far people did not care. Soon enough, I figured it would be fun if I had an accessoire related to the character I named myself after. I needed a scarf, so I decided it should be Rikku's iconic scarf from Final Fantasy X-2.

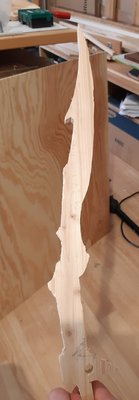
A hand holding a piece of wood that has the outer shape of Lightning's gunblade, scale one to two, raw woodThe story how I began to learn how to knit to make that scarf is one I might tell later. As scarfs can only be worn in winter (well, at least it's a burden in summer and I have limits), I wondered if I could make Rikku's daggers, too. I am okay in woodworking after all. Unfortunately the daggers turned out to have weird angles I don't really have an idea how to reproduce, so I postponed that.

Meanwhile, I started playing Final Fantasy XIII. Yeah, I know, I'm really late. That game is enough for another post but what's important is that the main character, or rather the one I like most, Lightning, has an iconic weapon, a sword that can transform into a gun, often refered to as a gunblade. Well, that would make a cool prop! It's absurd 101 cm long, but a lot of people made one already and so images and even sketches almost as detailed as an actual plan were available. My visual thinking is really, really bad and also I cannot imagine things I saw before in my head, so plan-like images are necessary whenever I want to make something that already exists.

Well... it escalated quickly. The gunblade turned out to consist of rather simple parts. For my woodworking, I always wanted to turn my reciprocating saw into a bandsaw-like machine by turning it upside down and screwing it to a table. That would be the tool of choice when making something with rather complex forms (read: forms more complex than a tri- or rectangle) from wood. So I did that and tried it out with a 1:2 scale printout of the gunblade's base glued to a leftover piece of wood. It worked out surprisingly well. The fun thing that also lead to the title of this text is that I used to take woodworking classes as a kid and also sometimes made wood versions of items from video games. I tend to attribute my woodworking hobby to the pandemic but that's actually not true.

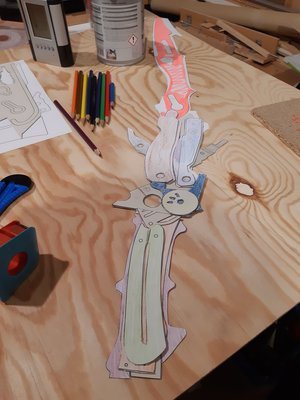
A cardboard model of Lightning's gunblade. The parts are colored but not in the original colors, rather in colors that help distinguish the parts. It's in original scale, about a meter long, it lays on a wood board and there are pens and tape, too. After testing the handling of the wood prototype with some weight attached to make it roughly the weight it would actually be, I made 1:1 scale printouts and a cardboard model. That worked pretty well, too (after figuring out how to print in true scale), and surprisingly, I found it quite satisfying to cut out the pieces and figure out which one belongs where. I was not satisfied with the idea of assembling them though. The positions of the parts in the middle do not really make sense. They match how it looks in the game and the official artworks but it just feels wrong to have them floating around. In the build I initially intended to copy they are attached to a base (which I made the wood prototype of) but that base does not actually exist in the original gunblade, the person who made the plans needed it to forge an actual sword. So I had to figure out how the transformation to a gun works, surely there must be more parts involved that were missing in my plans. Thanks to nice people posting cool stuff on the internet I found a series of images that show the transformation and apparently are pretty accurate. Unfortunately, what happens in the game is physically impossible. There are people on Youtube who built a transformable gunblade though, so I decided that I need a 3D model in CAD and began to learn Fusion 360.

- to be continued -

--

Du möchtest etwas zu diesem Artikel sagen? Schreib mir auf Twitter @Konzertheld, auf Mastodon @WildRikku@mastodon.gamedev.place oder einfach eine Mail an blog [at] konzertheld.de!